Draftsman's Day: Planning a Custom Wardrobe Build – Project Kickoff
In this ongoing series, I share insights into the real-world process of designing and building custom furniture. Today, we begin a new project: a bespoke wardrobe installation in an existing space.
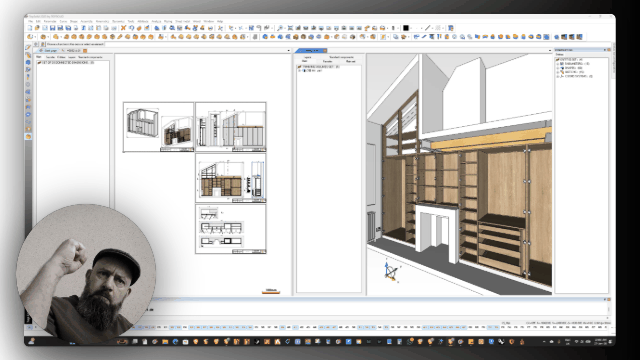
Initial Client Information and 3D Modeling
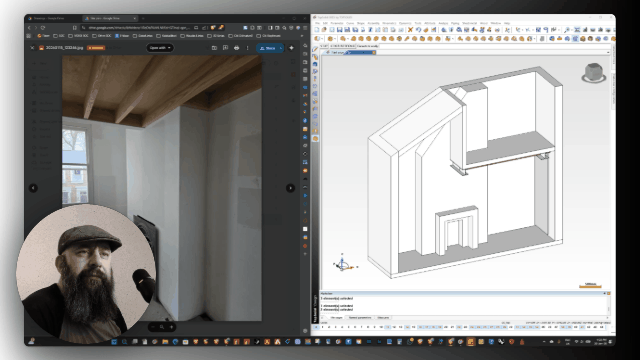
The client has provided photographs, key dimensions, and reference drawings. Although I have not yet visited the site, these materials allow for an accurate preliminary 3D model. The model incorporates critical structural elements, including ceiling beams and a prominent metal beam. Architectural renderings often serve to convey the overall concept; my role involves refining these ideas, identifying practical constraints, and resolving discrepancies before production begins.
Current Progress and Key Challenges
The rough cabinet layout has been blocked out in the model, showing three primary sections. Several issues require clarification or adjustment:
- Obstructing Metal Beam — The beam interferes with one cabinet section, limiting usability and potentially preventing proper hinge attachment. Proposed solutions include shortening the affected cabinet and adding a filler panel, or exploring alternative configurations based on the client's preferences.
- Long Shelf Spans — A narrow cabinet above the chimney features shelves exceeding 1.2 meters. Without a vertical divider, adjustable shelves risk sagging. I recommend incorporating a center support or fixed shelf.
- Hinge and Drawer Considerations — In areas with drawers, pocket hinge recesses may be necessary. Additional fixed shelving above drawers could improve functionality.
- Upper Hanging Sections — Double hanging rods appear suitable, but ceiling height in attic-like spaces often renders upper zones impractical. I suggest eliminating inaccessible high sections to simplify construction and improve aesthetics.
- Door Swing and Clearance — The first door in one section requires reversed opening direction to avoid contacting the ceiling.
- Radiator and Floor Clearance — A wider filler panel beside the radiator may protect doors from impact. Cabinets will be elevated approximately 70 mm on adjustable legs for leveling, with doors scribed to sit about 30 mm above the floor.
- Other Details — Internal electrical sockets and radiator access doors require confirmation to ensure integration and avoid future issues.
Next Steps
These observations will form the basis for client discussions and revised proposals. Once resolved, the design will advance toward detailed shop drawings and eventual production.
Custom built-in furniture projects involve numerous iterations before reaching the workshop. This series will document each stage, offering practical lessons for fellow woodworkers on planning, problem-solving, and client collaboration.
Stay tuned for updates on this wardrobe build and future custom projects. Your feedback and questions are welcome.
You can also fallow me here:
Patreon, Substack, ByMeaCoffee, Ghost
Thank you for watching.
If you find this helpful... hit the link below.
TIP JAR
Please leave comments, suggestions, ideas ... keep creating