Mastering the Plinth Frame: A Parametric Alternative to Adjustable Legs for Cabinet Installations
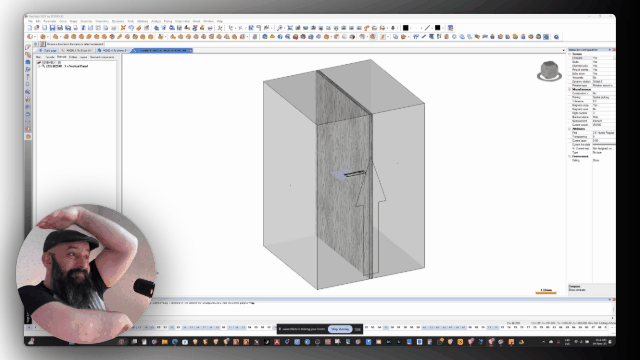
In the world of custom furniture design and kitchen cabinetry, efficiency on-site is key. If you're tired of relying on plastic adjustable legs, consider the plinth frame—a versatile, parametric component that's been a game-changer in my projects. This lightweight frame not only supports your cabinets but also acts as an instant layout mapper, helping you spot potential issues before they become headaches.
Why Choose a Plinth Frame Over Traditional Legs?
- On-Site Mapping: Drop the frame on the floor during installation, level it out, and instantly visualize your cabinet layout. It highlights obstacles, missing elements, or alignment problems right away.
- Proven Reliability: I've used this design for years with a partnering company. It's simple, effective, and holds up under weight without fuss.
- Material Benefits: Typically made from spruce ply, it's light, quick to assemble, and sturdy enough for everyday use—no need for ultra-precise materials here.
Key Parametric Drivers for Customization
This plinth frame is built with flexibility in mind, using parameters that adapt to your needs:
- Panel Thickness: Set globally (e.g., 18mm) for consistency across the frame, assuming uniform material.
- Floor Gap: Adjustable from 5-10mm or more for easy leveling and packing on uneven sites.
- Dividers: Choose manual mode (specify 1-5 or more) or automatic—dividers appear parametrically as the frame lengthens.
- Divider Spacing: Approximate distance (e.g., 400mm) ensures even support without overcomplicating things. Go wild with settings like 100mm for denser spacing if needed.
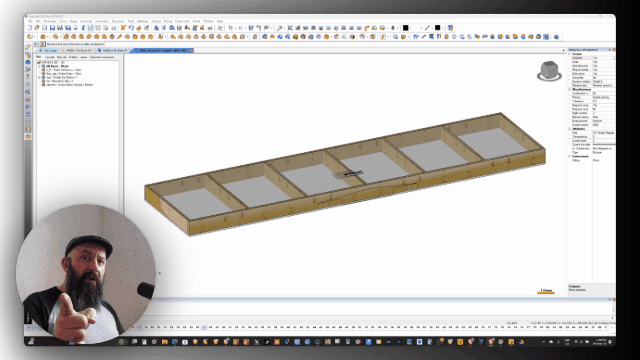
How to Use It: A Quick Demo in a Kitchen Corner Setup
Think in blocks for modular design—whether it's kitchen cabinets, staircases, or wall units. Here's a step-by-step example from my showroom:
- Create the Plinth Cover (Frontal Multi-Panel): Start with your cabinet block. Set thickness to 18mm, position 10mm from the front, and adjust horizontal/vertical quantities (e.g., two horizontal, one vertical, no gaps). Tweak to fit the outline or extend to the back.
- Add the Plinth Frame: Align to the floor (bottom plane) and cabinet base (top plane). Position behind the plinth cover, with 18mm thickness, 10mm gap, and 400mm spacing.
- Fine-Tune: Switch to manual dividers (e.g., add three or five), adjust spacing, and butt-join elements for a seamless fit. The result? A ready-to-install frame that keeps everything square and supported.
This setup is parametric, so changes ripple through automatically—perfect for iterative design in tools like Grasshopper or Rhino.
Download and Get Started
Ready to level up your cabinet installations? This plinth frame component is available for download at the bottom of this page. It's ideal for woodworkers, furniture makers, and kitchen installers looking for parametric solutions that save time and reduce errors.
If you're new here, subscribe for more tips on parametric furniture components, cabinet design hacks, and on-site installation tricks. Keep creating and stay strong—what's your go-to alternative to adjustable legs? Share in the comments!
Subscribe to Nordic Master tier to get access to this download.
Files will be available on the bottom of this page.
Created with Topsolid WOOD 2023, V6.24